Enabling KVM GPU Passthrough
How to enable GPU passthrough for KVM on Linux
Credits#
In this article, the “Enabling IOMMU” and the “GPU Passthrough” sections are adapted from Drakeor’s Blog ↗ with some clarifications and modifications. The original article is very well written and I highly recommend reading it.
If this article is helpful, make sure to check out Drakeor’s blog and support him. Thanks to Drakeor for the great work!
Enabling IOMMU#
Setup#
In my setup, I have a host machine with an NVIDIA GeForce RTX 4090 GPU and a guest machine running Ubuntu 24.04 Server for AI training. The host machine is running Ubuntu 24.04 LTS with 6.11 kernel. The host machine has a integrated Intel UHD Graphics 770 GPU, which is used for the host display. The NVIDIA GPU is passed through to the guest machine.
The host machine has the following hardware:
- CPU: Intel Core i9-14900K
- Motherboard: Gigabyte Z790 AORUS XTREME
- GPU: ZOTAC GeForce RTX 4090
- RAM: 64GB DDR5
- Storage: 2TB NVMe SSD
Enabling IOMMU is a crucial step for GPU passthrough. It allows the host machine to access the GPU directly. It takes two steps to enable IOMMU: enabling it in the BIOS and enabling it in linux.
BIOS Settings#
This tutorial assumes that you have IOMMU support for both your motherboard and CPU. Most modern server motherboards should support it, but your mileage may vary with desktop motherboards. Here are the options in BIOS corresponding to IOMMU related features:
- Intel Based: Enable “Intel VT-d”. May also be called “Intel Virtualization Technology” or simply “VT-d” on some motherboards.
- AMD Based: Enable “SVM”. May also be called “AMD Virtualization” or simply “AMD-V”. Note: I’ve seen “IOMMU” as it’s own separate option on one of my motherboards, but not on any of my other motherboards. Make sure it’s enabled if you do see it. If you don’t see it, it’s likely rolled into one of the former VT-d or AMD-V options listed above.
Some modern computers may have IOMMU enabled by default, so you may first verify whether it is enabled or not. If you are not sure, you can check the BIOS settings.
Checking for IOMMU Support on your CPU#
On Ubuntu/Debian for my Intel processor, it’s as easy as this:
cat /proc/cpuinfo | grep --color vmxIf you see colored vmx in the output, you have IOMMU support. If you see nothing, your CPU does not support IOMMU.
The AMD equivalent is this:
cat /proc/cpuinfo | grep --color svmThere are one other BIOS settings that I recommend enabling before you move on to the next section.
- Make sure the Primary GPU is set to integrated and not using your passthrough graphics card. This is called “Boot GPU” and “Primary Graphics” in my BIOS. Also remember to plug your monitor into the integrated graphics port on your motherboard. This is important because the host machine will use the integrated graphics for display and the passthrough graphics card will be used by the guest machine.
It is also worth notice that some motherboards have a setting called “Above 4G Decoding” or “Resizable Bar Support”. This is not the same as IOMMU. It is used for PCIe devices that require more than 4GB of address space. It is not required for IOMMU to work, but it is recommended to enable it if you have a GPU with more than 4GB of VRAM.
Once you’ve enabled the above settings, save and exit the BIOS. This is a one-time operation. You will not need to do this again unless you reset your BIOS settings.
Linux GRUB Settings#
Add the following options to your GRUB_CMDLINE_LINUX option in the /etc/default/grub file:
nano /etc/default/grubFor Intel CPUs, add the following options:
GRUB_CMDLINE_LINUX="... intel_iommu=on iommu=pt video=efifb:off"The … in the above line is the existing options. Make sure to keep them.
For AMD CPUs, add the following options:
GRUB_CMDLINE_LINUX="... amd_iommu=on iommu=pt video=efifb:off"And then update GRUB:
sudo grub-mkconfig -o /boot/grub/grub.cfgMake sure to reboot your system.
Then, to check that IOMMU is enabled, we can run the following command
sudo dmesg | grep -i -e DMAR -e IOMMUYou should see at least a message or two about it loading like below:
Feb 10 17:55:23.119993 opaleye kernel: pci 0000:00:00.2: AMD-Vi: IOMMU performance counters supported
Feb 10 17:55:23.123622 opaleye kernel: pci 0000:00:00.2: AMD-Vi: Found IOMMU cap 0x40
Feb 10 17:55:23.123691 opaleye kernel: perf/amd_1ommu: Detected AMD IOMMU #0 (2 banks, 4 counters/bank) •
Feb 10 17:55:23.124108 opaleye kernel: AMD-Vi: AMD IOMMUv2 loaded and initializedGPU Passthrough#
Find IOMMU Groups#
Finding IOMMU Groups
Before looking at the IOMMU Groups, I want to make sure that my graphics card is visible to the OS. I run the following command:
lspci -nnk | grep VGAFor me, this results in 2 graphics controllers being shown:
00:02.0 VGA compatible controller [0300]: Intel Corporation Raptor Lake-S GT1 [UHD Graphics 770] [8086:a780] (rev 04)
01:00.0 VGA compatible controller [0300]: NVIDIA Corporation AD102 [GeForce RTX 4090] [10de:2684] (rev a1)The first one is the integrated graphics card and the second one is the NVIDIA GPU. To list all the IOMMU groups they are part of, I’ll run the following command (TheUnknownThing notes: I’ve modified the command because the original one from drakeor’s blog was not working for me):
for d in /sys/kernel/iommu_groups/*/devices/*; do
  n=${d#*/iommu_groups/*}; n=${n%%/*}
  printf 'IOMMU Group %s ' "$n"
  lspci -nns "${d##*/}"
done | sort -V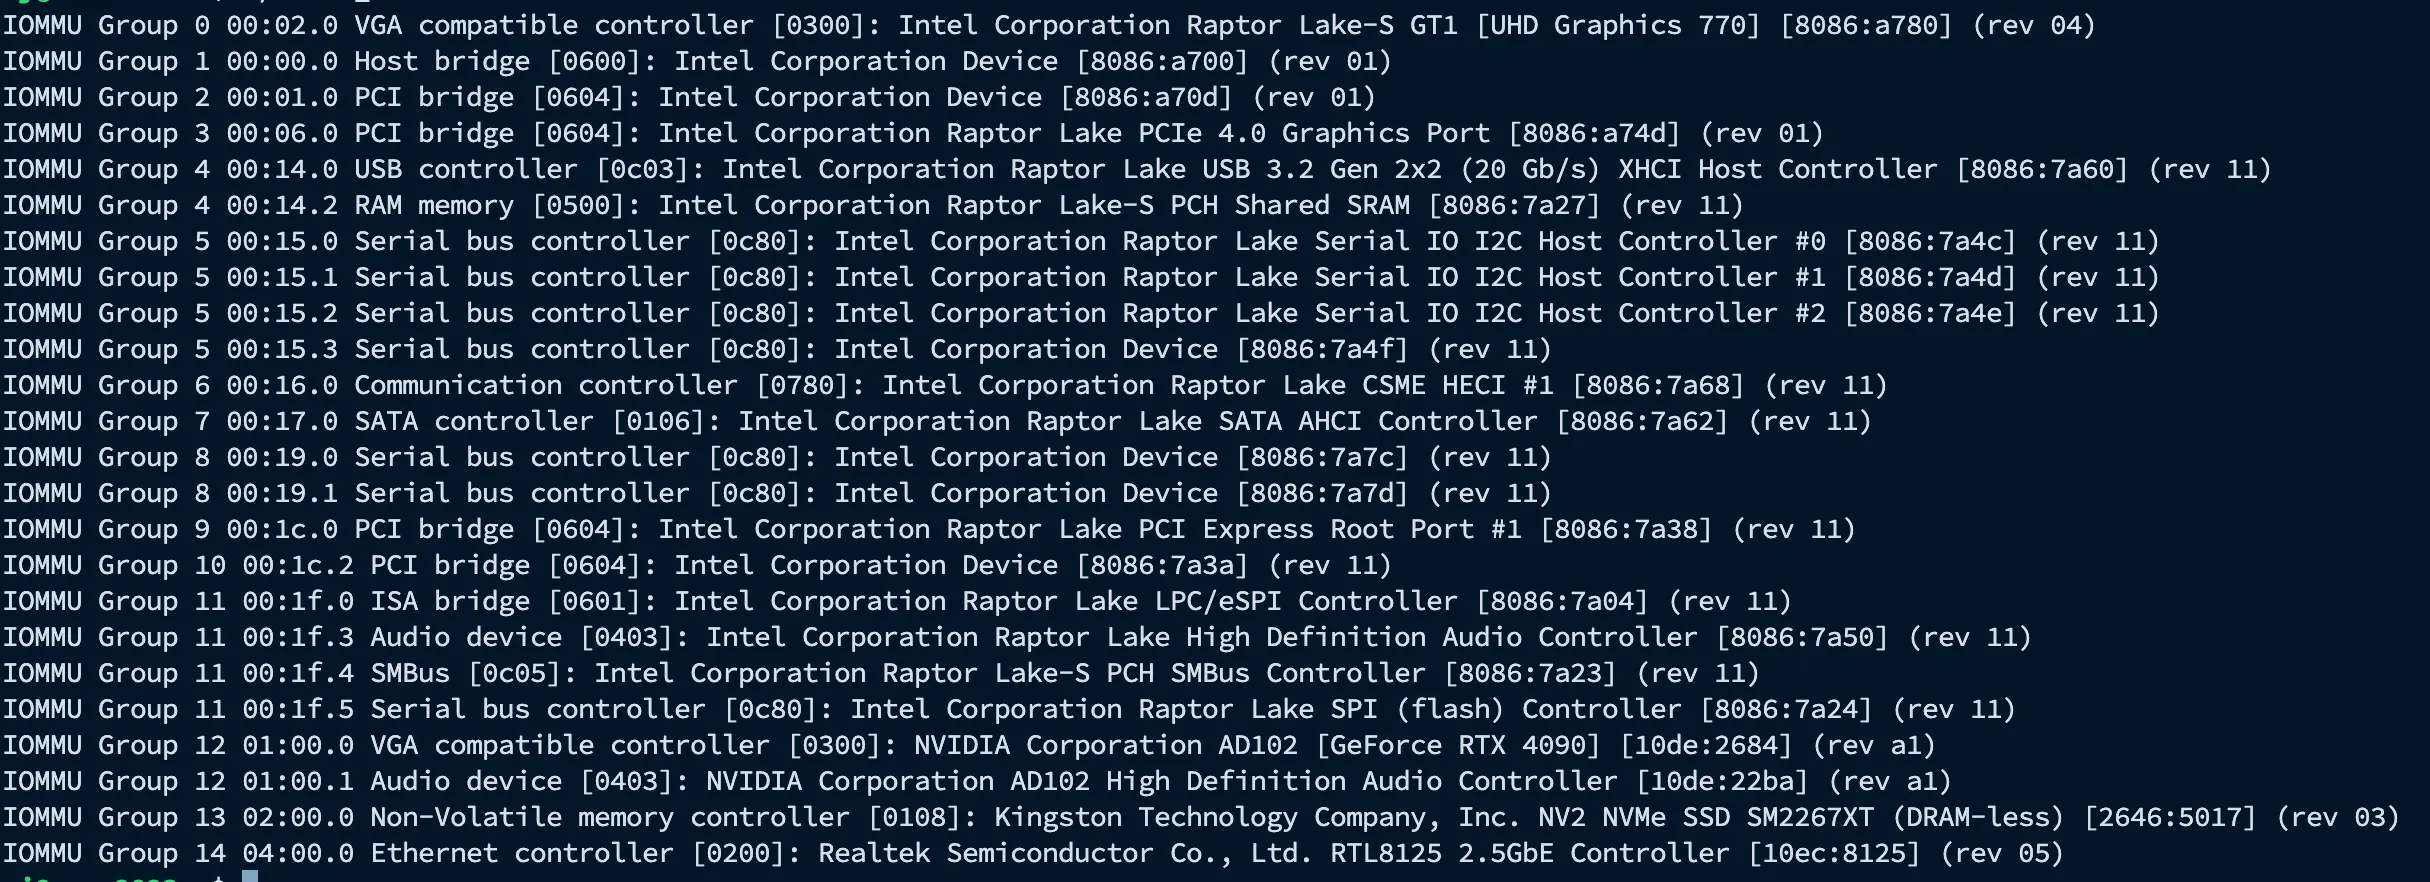
As is shown in the figure, my RTX 4090 is in IOMMU group 12.
Loading the Correct Kernel Modules#
Okay, so now that we have IOMMU all set, we need to make sure to load the correct modules for our passthrough graphics card. By default, nouveau will try to grab the graphics card when we boot.
I created a new file called /etc/modprobe.d/vfio.conf and added the following lines:
blacklist nouveau
options vfio_pci ids=10de:2684,10de:22ba
Note that I got the IDs from the IOMMU Group above. I need to pass in EVERY device in that IOMMU group or it won’t work! Even though I’m not using audio, I still need to pass in the audio device in that group.
Side note: why we need to block nouveau? Because it will try to grab the graphics card and we don’t want that. We want vfio-pci to grab it instead.
In /etc/modules-load.d/modules.conf, we’ll ensure vfio_pci is loaded at boot:
Add vfio_pci to the file:
echo "vfio_pci" | sudo tee -a /etc/modules-load.d/modules.confNow reboot your system.
Now run the following to make sure the correct module is being used:
lspci -nnkMake sure you see vfio-pci in the driver column for your graphics card.

Passing the GPU to the Guest VM#
If you haven’t installed the virt-manager or created your VM yet, please move on to the Creating a VM section.
So recall that the PCI address is on the left-side of when I ran lspci -Dnn earlier:
0000:01:00.0 VGA compatible controller [0300]: NVIDIA Corporation AD102 [GeForce RTX 4090] [10de:2684] (rev a1)We want to take that value (0000:01:00.0) and convert all the colons and dots into underscores. So for 0000:01:00.0, it will be 0000_01_00_0.
Now we need to detach the PCI device from the host machine. We can do this with the following virsh command:
virsh nodedev-detach pci_0000_01_00_0Then we’ll edit the VM we want to attach the GPU to with the following virsh command:
virsh edit <vm_name>Under the devices tag, we’ll add the GPU. Note that address, bus, slot, and function matches the PCI address we saw earlier. You could add the following to wherever you want in the devices section, but I like to put it at the end.
..
<devices>
...
    <hostdev mode='subsystem' type='pci' managed='yes'>
        <driver name='vfio'/>
        <source>
        <address domain='0x0000' bus='0x01' slot='0x00' function='0x0'/>
        </source>
    </hostdev>
...
</devices>
...Now save the file and reboot your VM, and you should see the NVIDIA GPU in the VM. Remember to install the NVIDIA drivers in the guest machine. For a quick test, I will run the following command in the guest machine:
sudo apt update
sudo ubuntu-drivers autoinstallAnd testthe following command to check if the NVIDIA drivers are installed correctly:
sudo nvidia-smiCreating a VM#
Prerequisites: Check Hardware Virtualization Support#
-
KVM requires hardware virtualization extensions (Intel VT-x or AMD-V) to be enabled in your system’s BIOS/UEFI. As we discussed earlier, I’ll assume you have this enabled.
-
Check if the KVM modules are loaded (after installation step below):
lsmod | grep kvmYou should see kvm_intel or kvm_amd listed.
Install Libvirt#
Ensure your package list is up-to-date:
sudo apt updateYou’ll need the Libvirt daemon, the QEMU/KVM hypervisor, and management tools.
The Libvirt package installation includes several components:
qemu-kvm: The KVM hypervisor backend.libvirt-daemon-system: The main Libvirt daemon that runs as a system service.libvirt-clients: Command-line tools for managing Libvirt (likevirsh).bridge-utils: Utilities for creating and managing network bridges (often needed for VM networking).virtinst: Tools to create virtual machines (likevirt-install).virt-manager: (Optional, but Recommended) A graphical user interface for managing VMs.
sudo apt install qemu-kvm libvirt-daemon-system libvirt-clients bridge-utils virtinst virt-managerThis command installs all the essential components, including the graphical virt-manager. If you are setting up a headless server, you can omit virt-manager.
Add Your User to the libvirt Group#
By default, only the root user can manage system-wide Libvirt virtual machines. To allow your regular user account to manage VMs without using sudo for every command, add it to the libvirt group.
sudo adduser <your_username> libvirtReplace <your_username> with your actual username.
Important: You need to log out and log back in for this group change to take effect. Alternatively, you can activate the group membership for your current shell session using newgrp libvirt (but logging out/in is generally recommended).
Verify the Installation#
Check the Libvirt daemon status by executing the following command:
sudo systemctl status libvirtdIt should show as active (running). If not, try starting and enabling it:
sudo systemctl start libvirtd
sudo systemctl enable libvirtdAnd check Libvirt connection (as your user, after logging back in):
virsh list --allThis command should run without errors (even if it shows an empty list of VMs). If you get a permission error, double-check that you’ve logged out and back in after adding your user to the libvirt group.
Create a Virtual Machine#
First, download the ISO image for the OS you want to install. For this tutorial, I will use Ubuntu 24.04 Server. You can download it from the official Ubuntu website ↗.
I will recommend using the virt-manager GUI for creating and managing VMs, as it simplifies the process significantly. However, if you prefer command-line tools, you can use virt-install.
To simplify the process, I will use virt-manager.
Launching virt-manager#
To launch virt-manager, run the following command in your terminal:
virt-managerThis will open the graphical interface for managing virtual machines. And the experience is quite straightforward, so I won’t go into detail here. Just follow the prompts to create a new VM.
Accessing VM through virsh console#
The virsh console command connects you to a serial console device that libvirt exposes to the virtual machine. For this to work bidirectional (input and output), two things need to be properly configured:
Virsh console#
In the Virtual Machine’s Libvirt XML, tt needs to have a <console type='pty'> or similar device defined, connected to a serial port (like target port='0'). You can double-check this by running virsh dumpxml ubuntu24.04 and looking within the <devices> section for a <console> or <serial> entry.
<serial type='pty'>
  <source path='/dev/pts/3'/>
  <target type='isa-serial' port='0'>
    <model name='isa-serial'/>
  </target>
  <alias name='serial0'/>
</serial>
<console type='pty' tty='/dev/pts/3'>
  <source path='/dev/pts/3'/>
  <target type='serial' port='0'/>
  <alias name='serial0'/>
</console>If this is missing, you’ll need to add it using virsh edit ubuntu24.04.
Inside the Guest VM#
Edit the GRUB configuration:
Open the GRUB default file in a text editor:
sudo nano /etc/default/grubFind the line that starts with GRUB_CMDLINE_LINUX_DEFAULT. It might look something like:
GRUB_CMDLINE_LINUX_DEFAULT="quiet splash"You need to add console redirection parameters. Add console=tty0 console=ttyS0,115200.
_ console=tty0: Ensures output also goes to the primary virtual console (if you still have one, which you likely do for initial setup).
_ console=ttyS0,115200: Directs kernel and boot messages to the first serial port (ttyS0) at a baud rate of 115200. This corresponds to the port='0' in the libvirt XML.
The line should become something like:
GRUB_CMDLINE_LINUX_DEFAULT="quiet splash console=tty0 console=ttyS0,115200"If you already have other parameters in this line, just add the console=... parts inside the quotes, separated by spaces.
Enable a Serial Getty Service:
Ubuntu uses systemd to manage services. You need to enable the service that provides a login prompt on the serial port.
sudo systemctl enable serial-getty@ttyS0.service
sudo systemctl start serial-getty@ttyS0.serviceThe enable command ensures it starts on boot, and start attempts to start it immediately.
After editing the GRUB configuration file, you must update the GRUB bootloader:
sudo update-grubAlso update Initramfs (necessary for console changes to take full effect early in boot):
sudo update-initramfs -uAnd remember to reboot your VM, and it should now be accessible via the virsh console command.